The Problem and the Acceptance
As underwater photographers, we constantly battle backscatter—that frustrating phenomenon where light from our strobes or flash reflects off tiny particles (silt, plankton, organic matter) suspended in the water.
On the low end, a small amount of backscatter can sometimes be acceptable, subtly conveying the natural environment and atmosphere the subject resides in.
However, when backscatter appears as a distracting pattern of bright specks and hazy blobs, the image takes on the frustrating persona of a blizzard. An image besieged by white dots and hazy spots is a scourge we must learn to mitigate.
In-Water Solutions: Backscatter Prevention 101
Even in locations with exceptional visibility (100-ft/30m or more), particles are present and will be illuminated by your light source. Preventing backscatter begins with solid technique.
Getting close to your subject is the most fundamental principle. Get physically closer to your subject to minimize the amount of water column between the lens and your subject.
This principle works exceptionally well with super wide-angle lenses (particularly fisheyes), which create the illusion that fewer particles are present for your strobes to illuminate.
Angling your strobes out and back is also key to keeping backscatter at bay is ensuring the light source’s cone is outside the camera’s field of view. This technique is often called “lighting from the sides” or “remote lighting.”
Pull both strobes back and away from the front of the camera housing (where the dome port begins). Angle them outward so the inner edge of their light cone illuminates the subject, while the brightest central part of the cone misses the foreground water column visible to the lens.
When using a single strobe, place it up high, typically in the 10 or 2 o’clock position, with a slight downward tilt. This effectively illuminates the most important, colorful portion of the scene while respecting the natural direction of the overhead light.
Sometimes less is more. Turning your strobe power down just enough to knock out shadows can be highly effective, reducing the amount of reflected light coming back at the lens.
Maintaining your buoyancy is also critical. Great buoyancy control prevents you from kicking up silt, sand, or stirred-up organic matter from the bottom, which immediately worsens backscatter.
Case Study: Goliath Grouper and Bait Ball
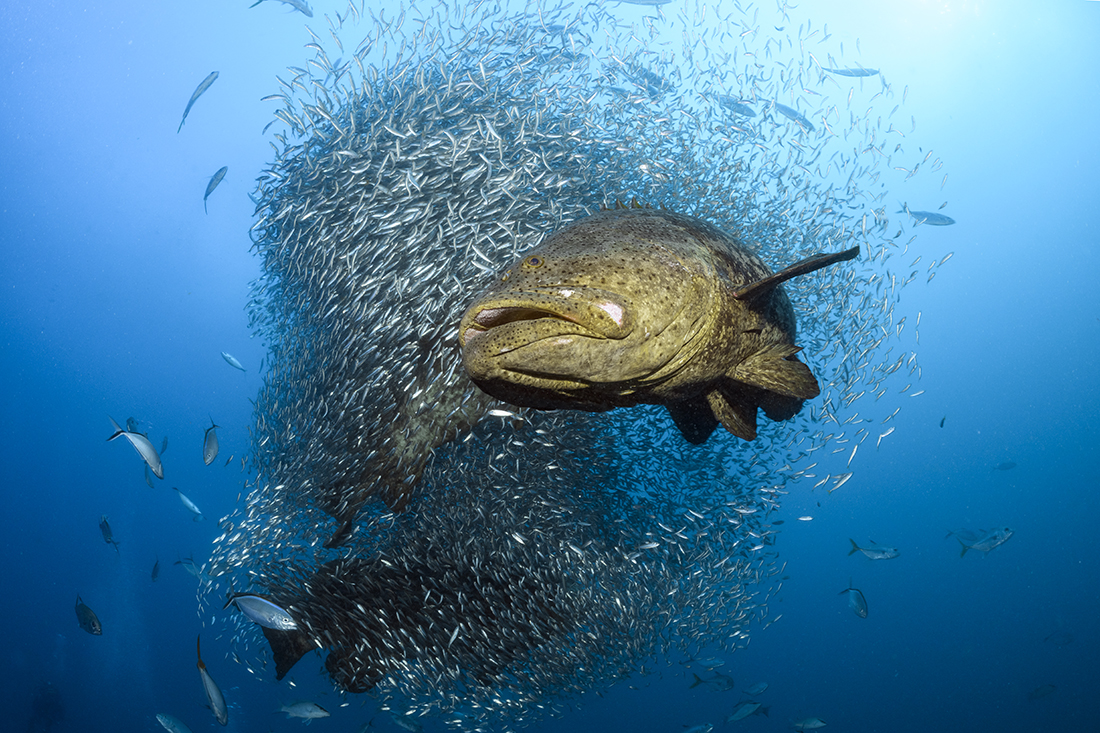
This image of a large Goliath Grouper out front of a swirling ball of baitfish was taken with a full-frame fisheye lens at distance less than 3 ft (0.9m) away. Underwater visibility off Jupiter, Florida, regularly fluctuates between 35 and 65 feet (10.7m and 20m).
Looking at the final image, conditions appear clean, but visibility was less than 40-foot (12m). To light the fish, both strobes were positioned as high as my 20-inch (50 cm) strobe arms allowed, angled outward so that the outer edge of each strobe’s emitted cone of light touched on the fish in the foreground. No cloning or healing tools were used in post-processing.

The particulate is still there; it’s just less noticeable because the strobes were positioned correctly.
Photo Software for Dealing with Backscatter
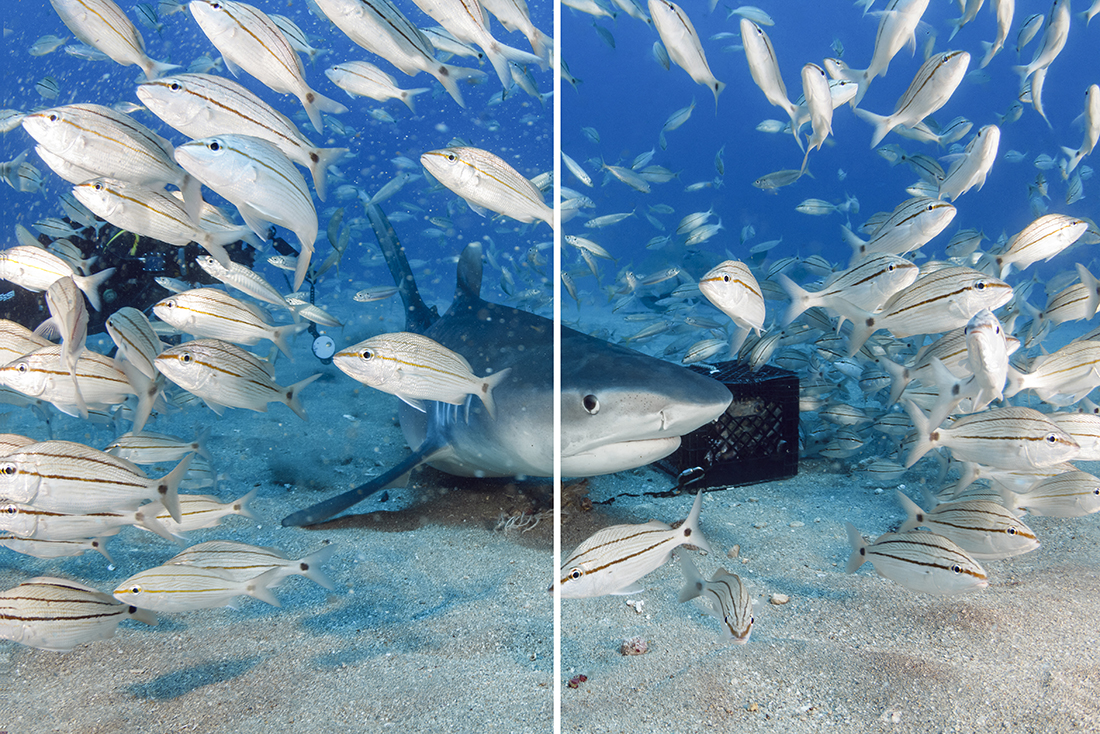
Here is an image of a large tiger shark about to cut through a bunch of baitfish. As you should be able to see, the left side of the image is full of backscatter stirred up by all the activity, whereas the right side has none.
Even when you’ve executed every in-water solution perfectly, sometimes backscatter prevails. This is where specialized software can save the day.
For minor backscatter removal, the Clone Stamp and Healing Brush tools in platforms like Adobe Photoshop and Lightroom are effective. However, manually removing hundreds of tiny specks often becomes a time-consuming, tedious process. There is also a single click solution that could be pivotal for you. Last year, a revolutionary tool was released: Backscatter Xterminator (BSXT). Developed by Adobe Guru Erin Quigley (goaskerin.com) and Bruce Warner, BSXT, this plug-in was developed for Creative Cloud versions of Adobe Photoshop and/or Lightroom. Under the name RC Astro, BSXT is designed specifically for removing backscatter from digital image files with remarkable accuracy.
Priced at $179.95 for 1 perpetual single user license (allowing installation on two separate Mac or PC computers) is a solution serious underwater photographers should look at.
Before investing in it, you will need see if operating system and processor meet the requirements for it to function. For example, Mac systems require MacOS 12 (Monterey) or later. Apple Silicon is preferred but not required. PC’s require Windows 10 or later and also must have CPU support for “AVX” instructions, which is what most CPUs have after 2012.
The Simplicity of BSXT
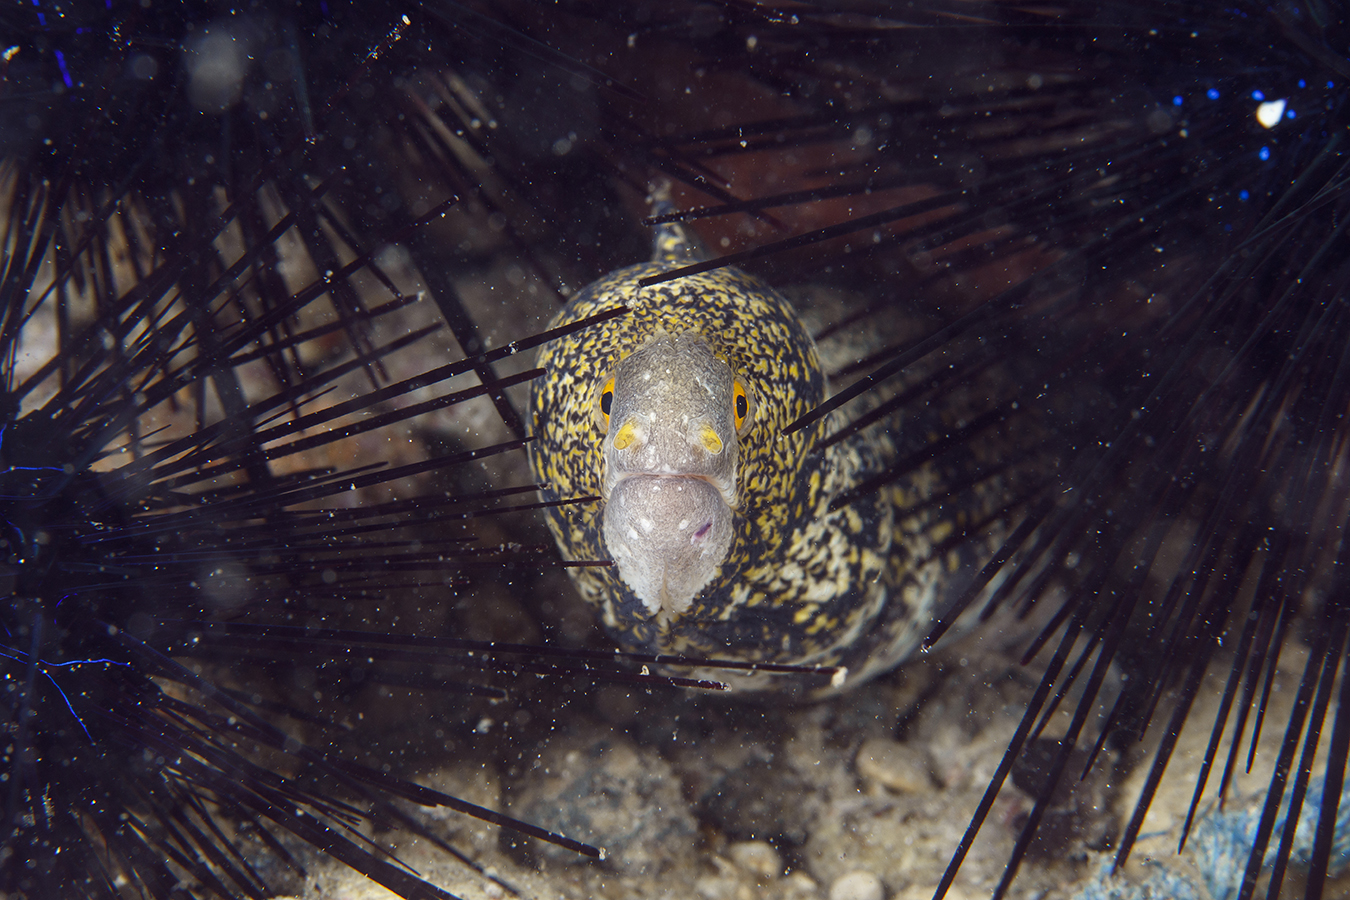
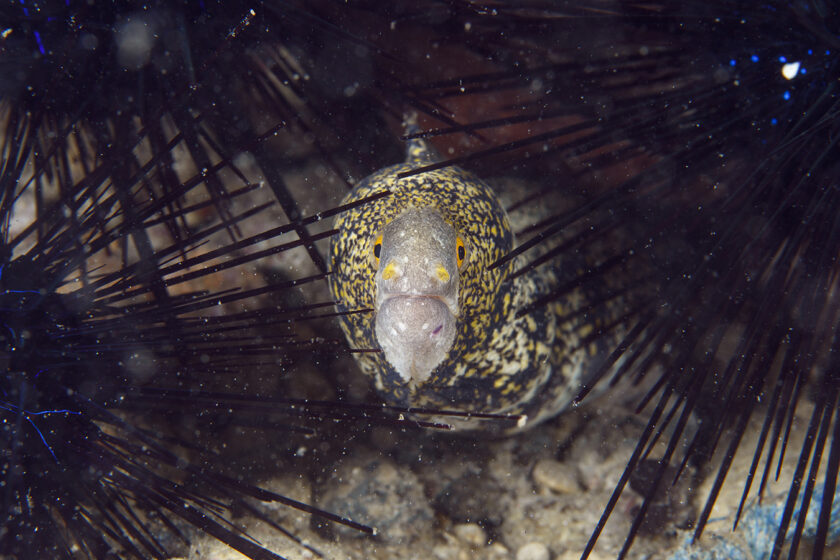
When this image of a small moray peering from between three black sea urchins, it had way too much white particulate in it to almost ruining the shot. Not wanting to waste time in manually removing all these little white specks and what appears to be a ghosted looking smug,
Caption or under the photo: When activated, BSXT uses AI to differentiate between the subject, the background, and the backscatter. With a single click, 99% of that backscatter is terminated in seconds.
The magic behind the BSXT software lies in its AI component, which automatically differentiates the main subject(s) in the foreground from the background. This process is executed by generating three separate layers within the image file. When viewed in the Layers Panel of Photoshop or Lightroom’s editing software, these layers are stacked from bottom to top: the original image, labeled Background, is at the bottom; above it is the BSXT layer, where the core backscatter extermination (removal) process takes place; and finally, the top layer is the empty Cleanup layer, reserved for final manual adjustments.
The layered structure provides additional flexibility and control to correct errors, such as when the AI component mistakenly removes fine details, like a few fin rays from a fish’s tail or delicate white spots on a subject’s body. In these rare instances, you can use the layer mask attached to the BSXT layer to restore lost detail: simply use a brush tool to reveal portions of the background (original image) beneath the BSXT layer. For more fine-tuning, the empty Cleanup layer is available; here, you can use the Healing Brush tool to eliminate any remaining, stubborn backscatter stragglers. Once you have removed enough backscatter to your liking, flatten the layers and continue with any other post-processing steps warranted in your workflow.
Final Thoughts
Mastering underwater photography means mastering light control, and that begins with minimizing backscatter through smart strobe positioning and good buoyancy. But when Mother Nature (or Mr. Murphy) interferes, having a powerful, time-saving tool in your digital arsenal is the ultimate advantage.
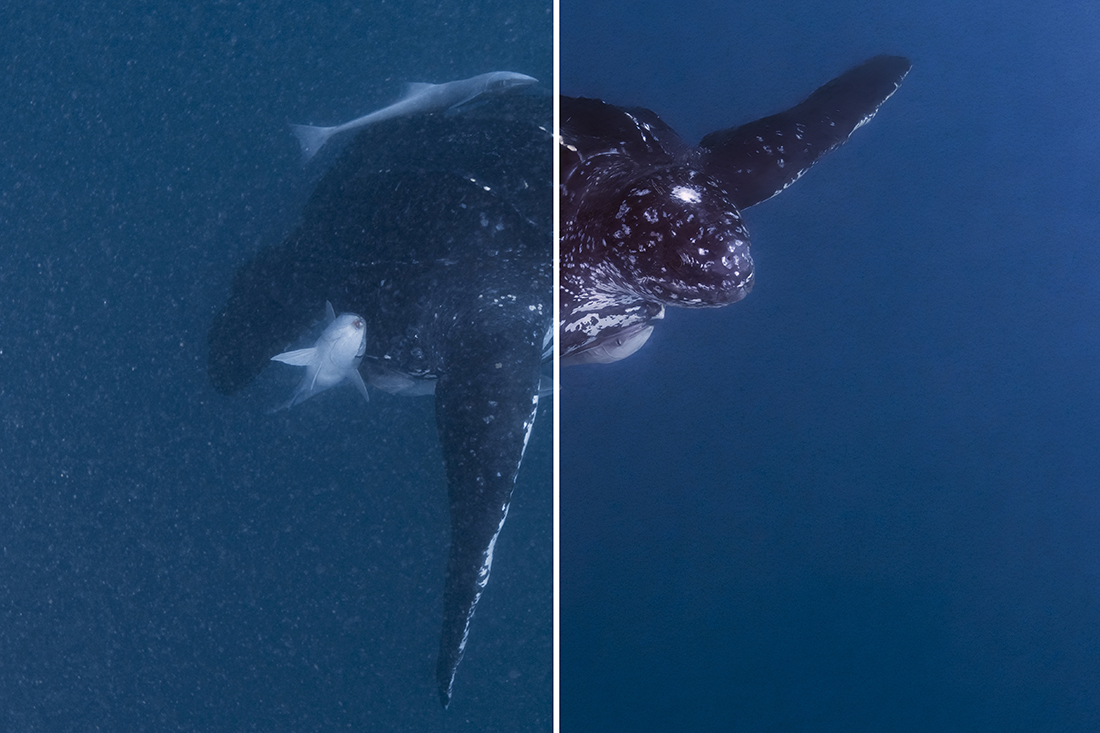
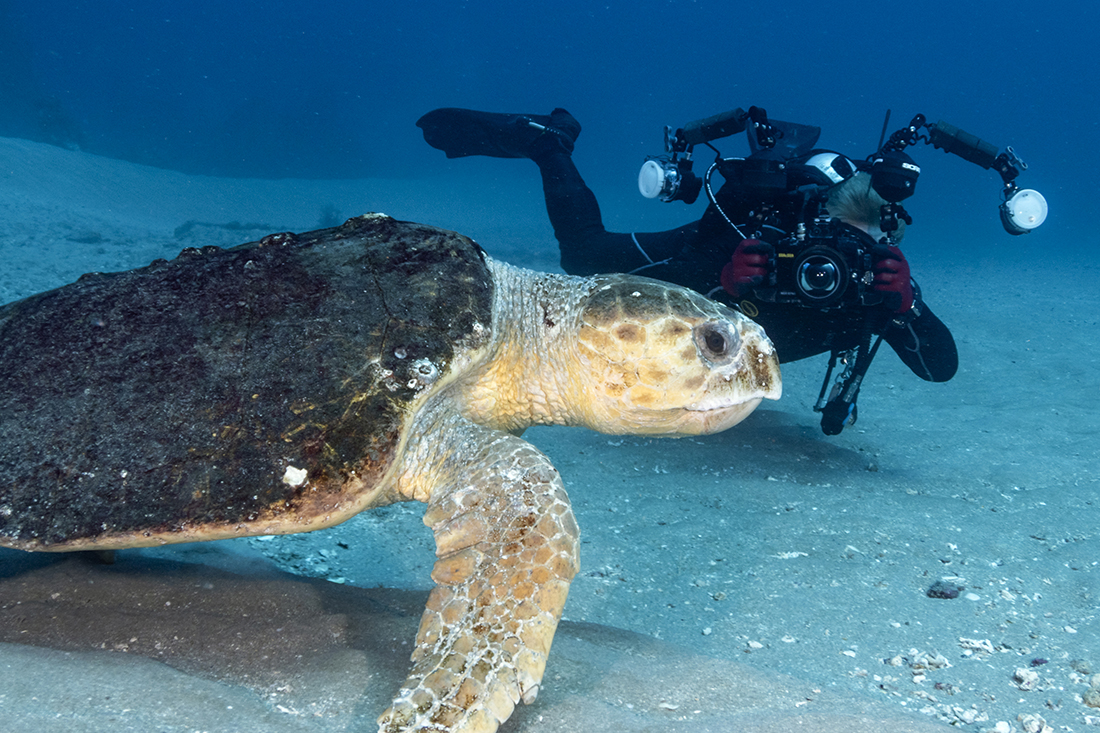
This image of a large leatherback sea turtle was taken in one of the most challenging set of conditions where underwater visibility was less than 15 feet with a horrible amount of particulate floating the water. Yet, after a little post processing followed by executing Backscatter Xterrminator I was able to raise it from the dead into a useable image.
If you despise the tedious, manual process of dot removal, Backscatter Xterminator isn’t just a convenience—it’s a game-changer that gives you back hours of your life to spend planning your next dive. And when you are on that dive, don’t forget what I discussed early on: use as many techniques as possible to avoid getting backscatter in the image in the first place. Then you will not have to depend on software to fix a good image that may be ruined by stubborn backscatter.