In my last column, “The Art of Captivating Macro Portraits,” I touched on some of my techniques to capture macro subjects in a more complementary way. This time around, I will dive into (no pun intended) a particular shooting style known as Close-Focus, Wide-Angle photography – commonly referred to as CFWA.
CFWA is a subdivision of wide-angle photography where the distance between your primary subject and the front of your dome port is often measured in inches rather than feet.
In the past, the go-to lens was a full-frame fisheye for its immense depth of field and minimum focusing distance, down to just shy of touching the port itself. Many of the new wide to ultra-wide (24mm to 10mm) rectilinear, a.k.a. non-fisheye, wide-angle optics made for mirrorless systems can now come as close as a fisheye. However, the one thing they lack is that same degree of forced perspective fisheye lenses are known for. Forced perspective is a technique that uses optical illusion to make objects appear larger or smaller than they actually are. With fisheye lenses, this effect is often pronounced, making close objects appear very large and distant objects very small.
In wide-angle photography, and especially with fisheye lenses, forced perspective is often more pronounced. Objects closer to the lens appear much larger, while objects farther away seem much smaller, creating a dramatic sense of depth and scale. This can be used creatively to emphasize a subject or create a more dynamic composition.
I particularly enjoy this aspect of underwater wide-angle photography as it allows me to get more candid pictures of large subjects like sea turtles, large groupers, and sharks. But it doesn’t end there.
Just because you opted to forgo your favorite macro lens for a super wide-angle lens doesn’t mean the end of opportunity when you happen upon something really cool that also happens to be the size of your fist or smaller.

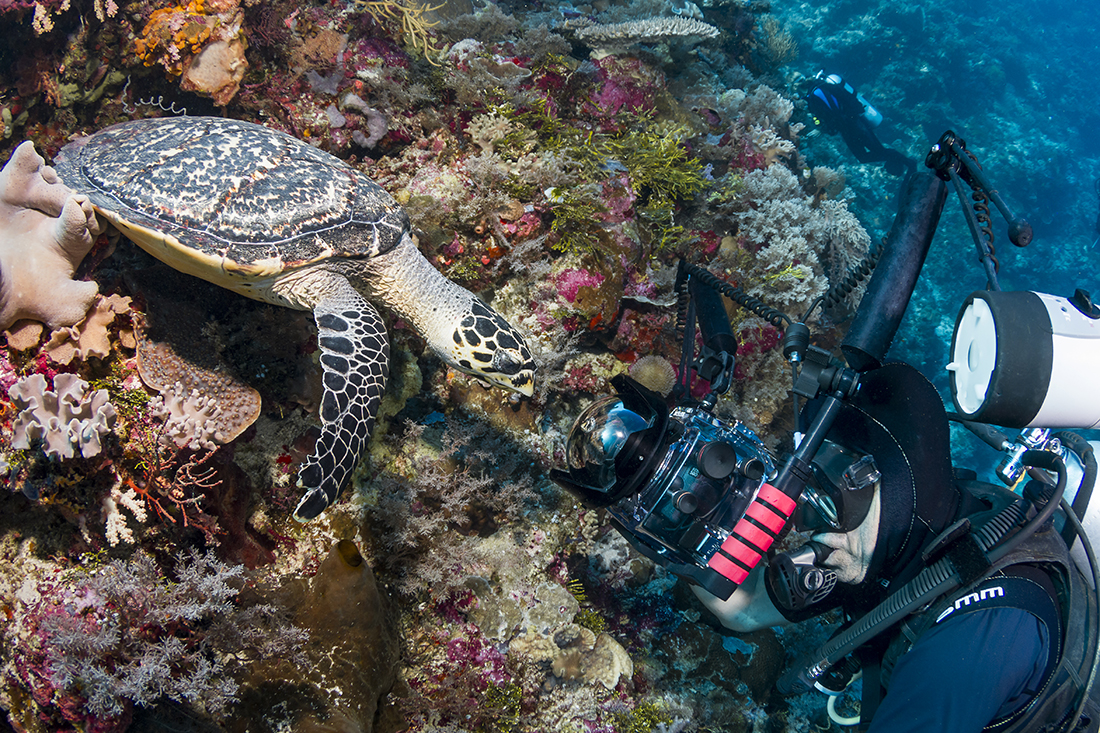
This CFWA shot of a common octopus perched atop a yellow tube sponge, with an Atlantic spotted scorpionfish (which you might have missed at first) below it, was taken with a full-frame fisheye. Between the lens’ super-short minimum focus and forced perspective, I was able to include enough of the ecosystem they live in with the two subjects.
In a pinch, I have incorporated CFWA shooting strategies to capture surprisingly small subjects, from frogfish and seahorses to even a group of 1-inch-long cleaning gobies resting on a brain coral.
Furthermore, shooting CFWA does not run into the same limitations as shooting wide-angle scenics when underwater visibility is significantly hampered. In fact, having less water between you and your subject increases your ability to capture an image with better color and clarity.
All said and done, there is a little more involved than pushing the dome port into the face of your subject and hoping for the best.
CFWA requires a little more attention to composition and lighting.
Composition: Golden Ratio or Rule of Thirds
Some photographers will advise that more visually appealing CFWAs are best composed vertically.
While that may be truer with static subjects like sea anemones, coral, and sponges that have a more vertical profile, dynamic forms of marine life like turtles, sharks, and fish tend to be on the move, often necessitating the need to shoot horizontally.
Either way you go, vertical or horizontal, a good photographer needs to develop an eye for the way a subject(s) occupies a setting to create a more visually interesting image.
The two most commonly discussed rules of composition for achieving greater symmetry and balance in an image are the Golden Ratio and the Rule of Thirds.
The Golden Ratio relies on using a mathematical formula to identify the symmetry in a subject by dividing the image space it will occupy first into two parts, with the larger part (a) taking up one end of the rectangle.
The process is repeated by dividing the smaller space (b) into another series of squares equal in ratio to the sum of (a) + (b) divided by (a), which equals 1.618.
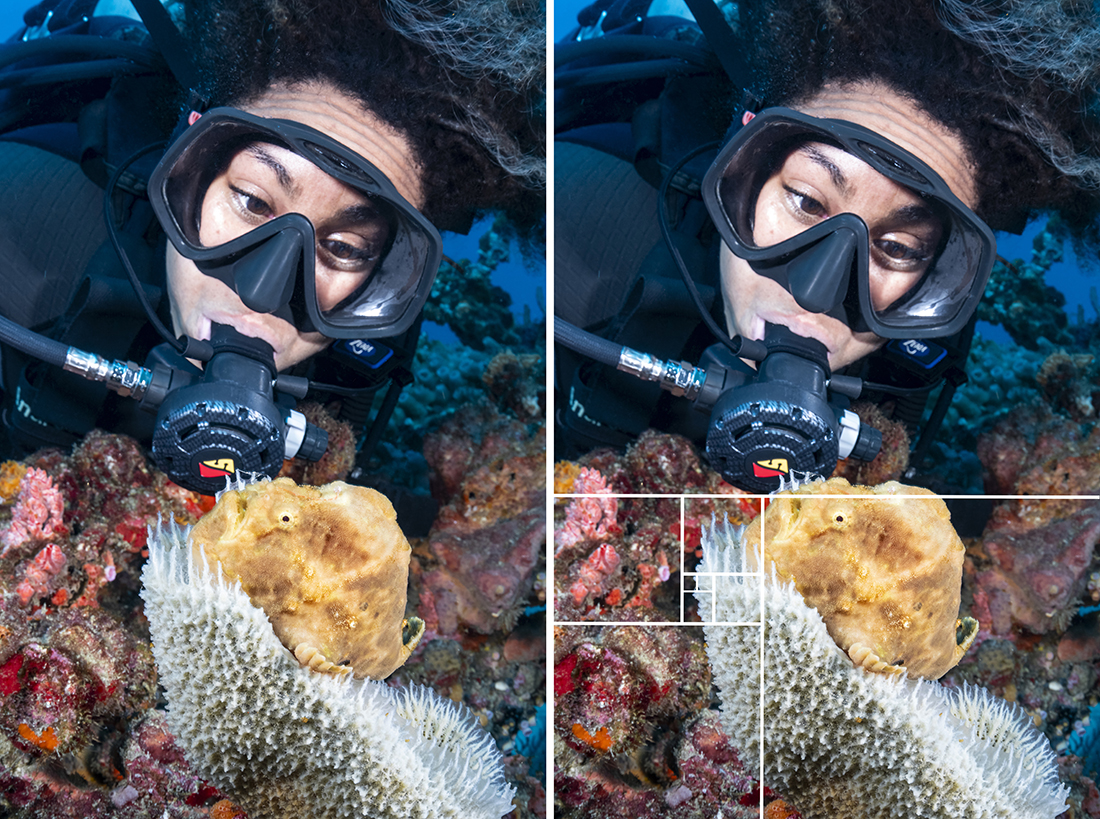
Using a Nikon D500 with a Tokina 10-17mm fisheye zoomed in at 17mm, I was able to capture this portrait of my dive guide Andrea Whitaker taking a really close look at a yellow longlure frogfish.
Looking at the same image to the right, you can see that I have placed an overlay showing how the Golden Ratio works.
The primary focal point is Andrea’s face occupying the larger (area a) square.
Following her eyes downward brings you to the frogfish occupying the secondary (area b) square.
Following the rest of the progression of smaller squares brings you back to the face of the frogfish.
In layman’s terms, imagine a rectangle sectioned off by a sequence of squares getting progressively smaller than the next with each addition.
Once done, we can compose the famous golden spiral. The most well-known image representing the golden ratio is a crosscut of a nautilus shell.
For the sake of simplicity, leave using the Golden Ratio to the mathematical whiz kids and use the Rule of Thirds.
In comparison, the Rule of Thirds uses a three-by-three grid comprised of two equally spaced horizontal and two equally spaced vertical lines to create a total of nine rectangles of equal size.
Here, I should note that most DSLR and mirrorless cameras have a visual grid overlay function in the camera’s menu. In it, you can select a 3×3 grid overlay that will provide an accurate guide in your viewfinder/rear LCD for Rule of Thirds composition.
In my “Positive Side of Negative Space,” I explained the strategy of using negative space to provide a sufficient amount of breathing room around the subject so as not to make it feel overly cluttered or busy to the eyes.
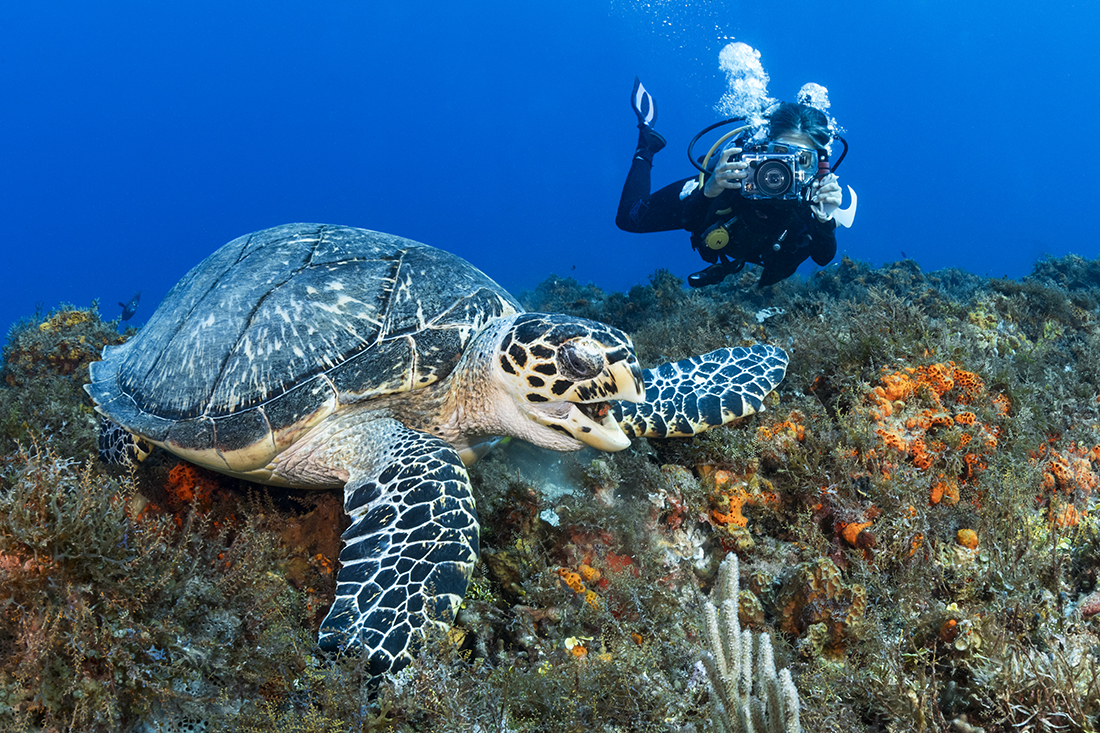
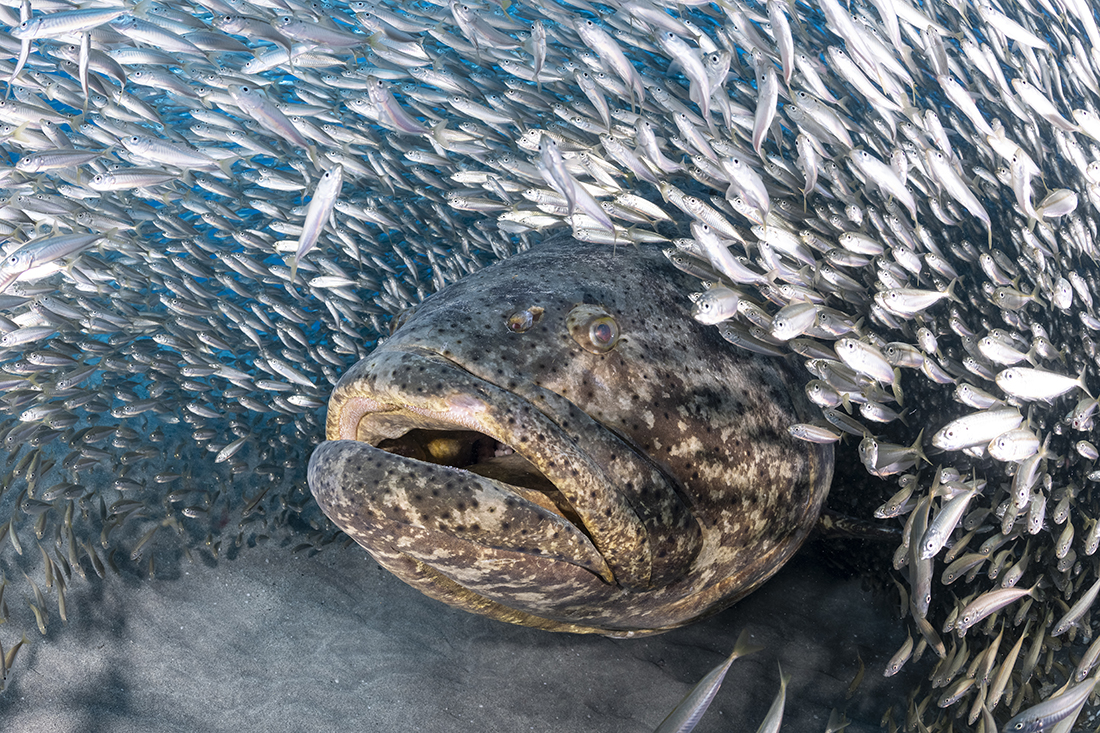
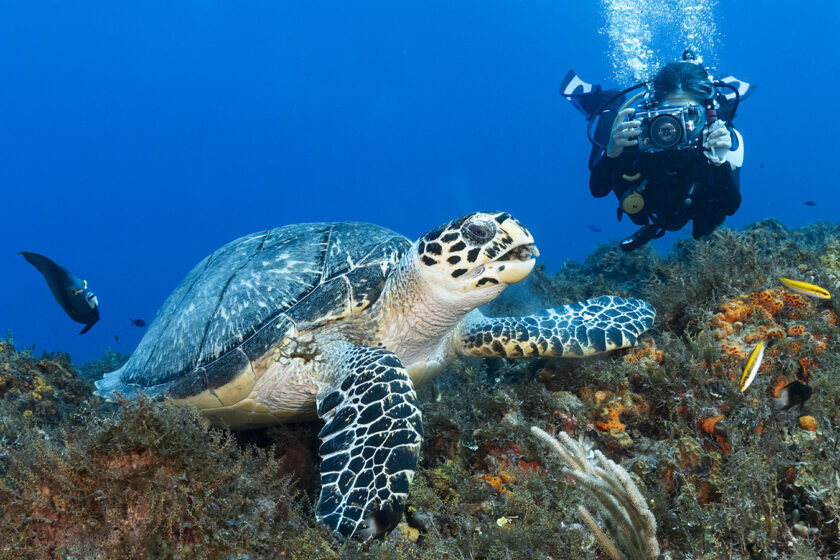
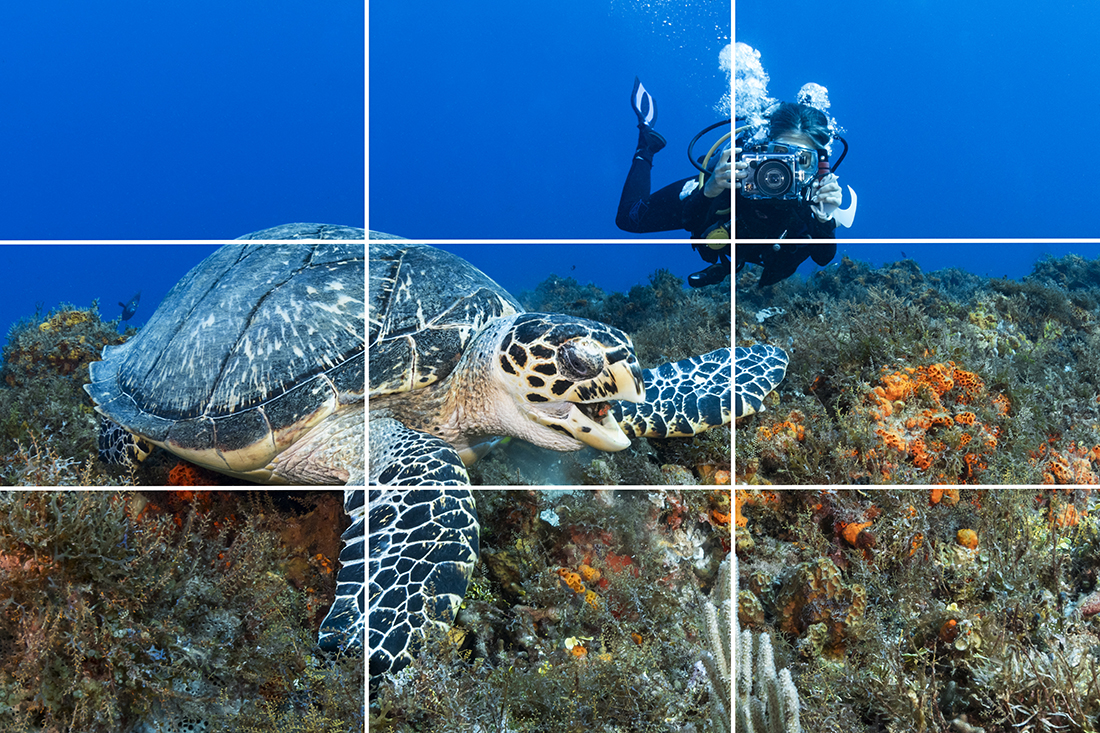
Here I have placed two CFWA images of a hawksbill sea turtle resting on the bottom with a diver in the background, and a Goliath grouper surrounded by swarm of bait fish. In both cases, I not only achieved my aim of having the main subject up close and personal but also accomplished an aesthetically balanced image with a little bit of negative space.
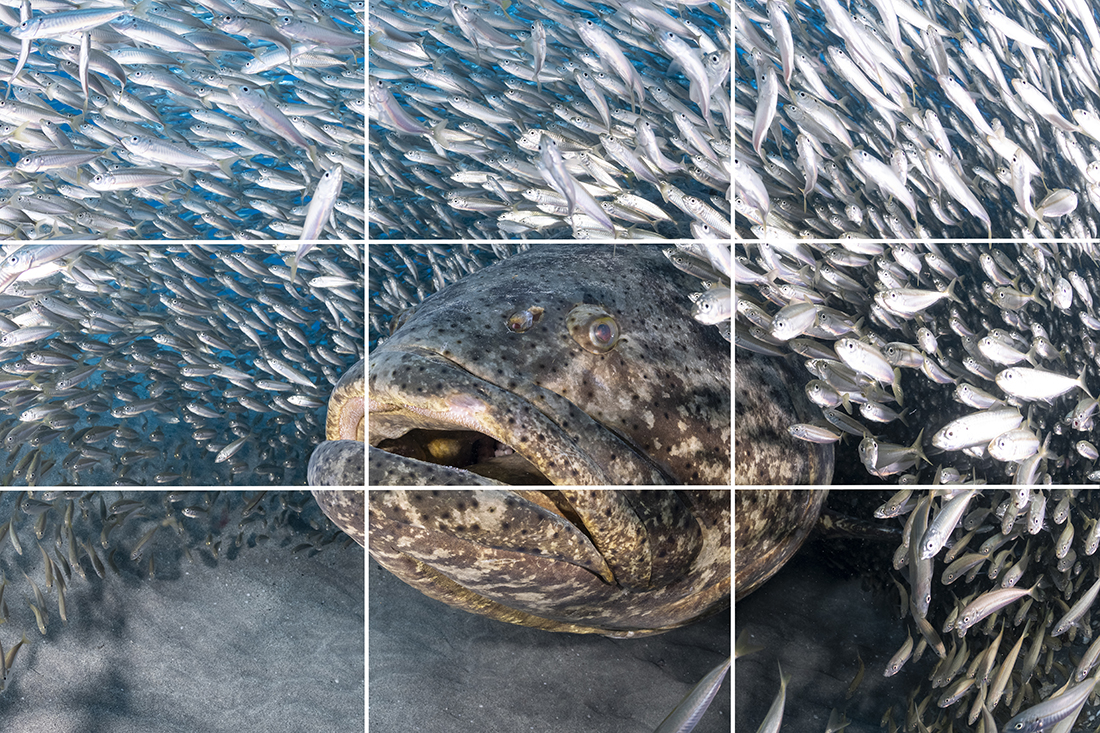
As a visual aid to make it easier to comprehend how the Rule of Thirds work, I have laid a 3×3 grid across the same two images, breaking the image space into nine zones.
Looking at the grid, most of the sea turtle falls into two of those zones, with the focal point of the diver with a camera in the third, helping the eye track its way around the image and find things that create a triad within those nine zones.
When implementing the Rule of Thirds during composition, elements should be placed where these lines of the grid intersect or segment your image. In the picture of a Goliath grouper emerging from a cloud of baitfish, which was shot with a full-frame fisheye lens, rendering my working distance to around 12 to 16 inches, the eye of the fish is in the center zone with the majority of its lower jaw in the zone below it.
Whereas a photo with an interesting element in only one section likely won’t be as successful as a photo that’s interesting top-to-bottom, side-to-side, or diagonally.
In short, it’s all about blank space and its relation to the “pay attention” space as a means of creating a pleasingly balanced image.
Lighting for CFWAs
Lighting for CFWA photography, especially with ultra-wide-angle lenses, can be a little tricky.
First things first.
When it comes to what kind of strobes you need for CFWA, size doesn’t matter!
Due to the close working distance between camera and subject, the power requirement should not be intense.
The name of the game is to avoid frying the foreground elements—sand, coral, small fish, etc. Rather, what is more desirable is that the light generated by the flash is diffused enough to provide a pleasingly soft spread across your subject.
Coming back to the Goliath grouper portrait, the greatest challenge for lighting was not the face of the grouper, but rather all the bright little silver-sided fish creating a mirror-like halo around it.
The upside is, in working as close as I was, I was able to tuck my two (Retra Prime) strobes in closer to the sides of the camera housing in the 10 and 2 o’clock positions.
From that position, both strobes only needed to be in the ¼ power range to be effective.
As an added complication, the baitfish on the upper right and side of the frame were off-center of the primary subject, placing them in closer proximity to my right strobe, which necessitated my dropping the power setting a click or two so as to blow them out and ruin the shot.
Yes, having good quality strobes really does make a difference, but never rule out using good diffusers as well.
Common recommendations for strobe placement for CFWA are to pull strobes further back than you have them during normal wide-angle shooting.
Pulling them as far back as the flash tube is aligned with the handles of the housing will maximize the space for the beam to spread and soften.
My best advice for nailing down the lighting where it becomes second nature is practice and experimentation. A good target is something the size of a basketball (rock, sponge, small coral head, etc.) surrounded by an open sandy bottom. Watch where and how the light falls on your subject, taking note of whether the lighting is too strong, too weak, and discovering how much you need to change where the strobes are aimed to reduce blowing the sand in the foreground, to how the shadows play on the subject itself.
While doing this, you might want to keep in mind regarding exposures for CFWA, to get a more dynamic image, take in the prospect that in addition to a flash-filled foreground, the presence of ambient light to illuminate the background can be incorporated into your shot. As a way of reviewing how to combine sun and flash for a more dynamic picture, I recommend going back to my article “Balancing Flash With Ambient Light” that discusses art of balancing naturally occurring available light with artificial light from your underwater lighting system.